1.简介
Swagger 是一个用于生成、描述和调用 RESTful 接口的 Web 服务。通俗的来讲,Swagger 就是将项目中所有(想要暴露的)接口展现在页面上,并且可以进行接口调用和测试的服务。
Swagger 官网地址:https://swagger.io/
Swagger的作用:
- 将项目中所有的接口展现在页面上,这样后端程序员就不需要专门为前端使用者编写专门的接口文档;
- 当接口更新之后,只需要修改代码中的 Swagger 描述就可以实时生成新的接口文档了,从而规避了接口文档老旧不能使用的问题;
- 通过 Swagger 页面,我们可以直接进行接口调用,降低了项目开发阶段的调试成本。
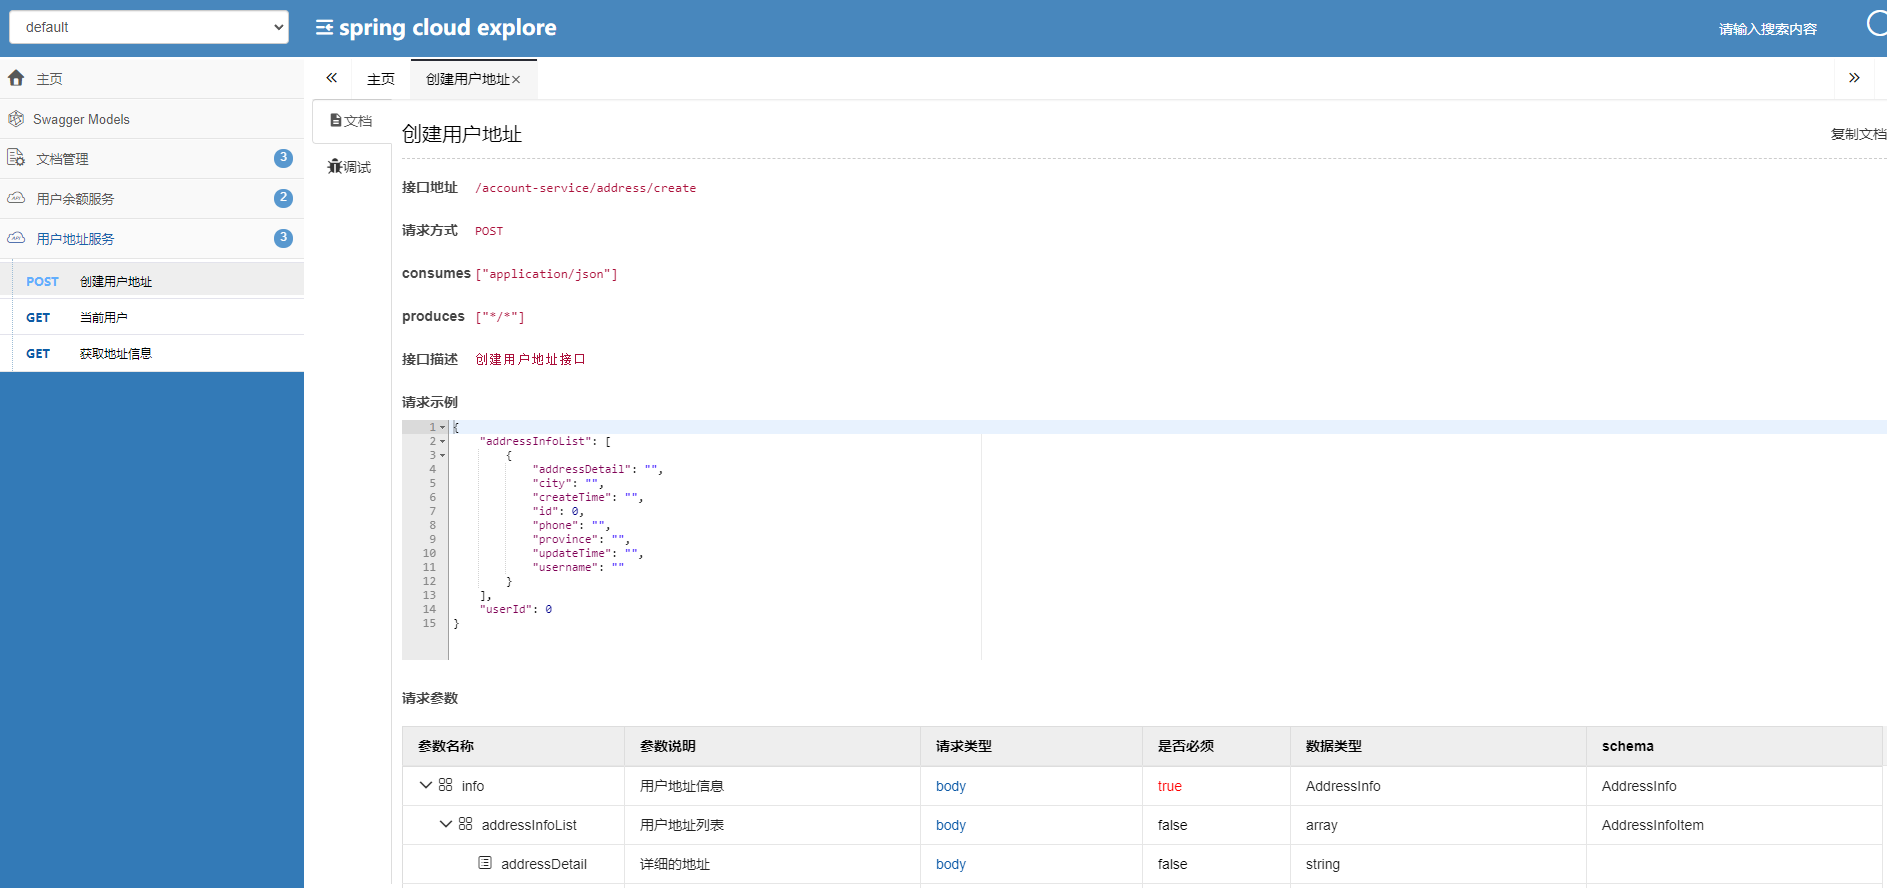
swagger-ui是swagger提供的ui界面,但是改界面的使用习惯和国人的不太符合,github上有一个swagger-bootstrap-ui 的ui界面的显示效果比较友好一些。
2. 使用方法
2.1 添加pom依赖
    <dependencies>
        <!-- swagger 用于定义 API 文档 -->
        <dependency>
            <groupId>io.springfox</groupId>
            <artifactId>springfox-swagger2</artifactId>
            <version>2.9.2</version>
        </dependency>
        <dependency>
            <groupId>io.springfox</groupId>
            <artifactId>springfox-swagger-ui</artifactId>
            <version>2.9.2</version>
        </dependency>
        <!-- 美化 swagger -->
        <dependency>
            <groupId>com.github.xiaoymin</groupId>
            <artifactId>swagger-bootstrap-ui</artifactId>
            <version>1.9.3</version>
        </dependency>
    </dependencies>
2.2 编写Swagger配置类
package cn.firecode.explore.micro.conf;

import org.springframework.context.annotation.Bean;
import org.springframework.context.annotation.Configuration;
import springfox.documentation.builders.ApiInfoBuilder;
import springfox.documentation.builders.PathSelectors;
import springfox.documentation.builders.RequestHandlerSelectors;
import springfox.documentation.service.ApiInfo;
import springfox.documentation.service.Contact;
import springfox.documentation.spi.DocumentationType;
import springfox.documentation.spring.web.plugins.Docket;
import springfox.documentation.swagger2.annotations.EnableSwagger2;

/**
 * <h1>swagger2 配置类</h1>
 * @Project spring-cloud-explore
 * @Author flynn
 * @Date 2022/1/4
 */
@Configuration
@EnableSwagger2
public class SwaggerConfig {

    /**
     * <h2>Swagger 实例 Bean 是 Docket, 所以通过配置 Docket 实例来配置 Swagger</h2>
     * */
    @Bean
    public Docket docket() {

        return new Docket(DocumentationType.SWAGGER_2)
                // 展示在 Swagger 页面上的自定义工程描述信息
                .apiInfo(apiInfo())
                // 选择展示哪些接口
                .select()
                // 只有 cn.firecode.explore 包内的才去展示
                .apis(RequestHandlerSelectors.basePackage("cn.firecode.explore"))
                .paths(PathSelectors.any())
                .build();
    }

    /**
     * <h2>Swagger 的描述信息</h2>
     * */
    public ApiInfo apiInfo() {

        return new ApiInfoBuilder()
                .title("spring cloud explore")
                .description("spring cloud explore micro service")
                .contact(new Contact(
                        "Flynn", "www.firecode.cn", "yangfan.csc@gmail.com"
                ))
                .version("1.0")
                .build();
    }
}
2.3 swagger的基本使用
@ApiModel 和 @ApiModelProperty 用于标注参数信息,@Api和@ApiOperation用于标注接口信息,基本的使用实例:
package cn.firecode.explore.sdk.account;

import io.swagger.annotations.ApiModel;
import io.swagger.annotations.ApiModelProperty;
import lombok.AllArgsConstructor;
import lombok.Data;
import lombok.NoArgsConstructor;

import java.util.Date;
import java.util.List;

/**
 * @Project spring-cloud-explore
 * @Author flynn
 * @Date 2022/1/4
 */
@ApiModel(description = "用户地址信息")
@Data
@NoArgsConstructor
@AllArgsConstructor
public class AddressInfo {

    @ApiModelProperty(value = "用户id")
    private Long userId;

    @ApiModelProperty(value = "用户地址列表")
    private List<AddressInfoItem> addressInfoList;


    @ApiModel(description = "地址信息")
    @Data
    @NoArgsConstructor
    @AllArgsConstructor
    public static class AddressInfoItem{

        @ApiModelProperty(value = "地址表主键 id")
        private Long id;

        @ApiModelProperty(value = "用户姓名")
        private String username;

        @ApiModelProperty(value = "电话")
        private String phone;

        @ApiModelProperty(value = "省")
        private String province;

        @ApiModelProperty(value = "市")
        private String city;

        @ApiModelProperty(value = "详细的地址")
        private String addressDetail;

        @ApiModelProperty(value = "创建时间")
        private Date createTime;

        @ApiModelProperty(value = "更新时间")
        private Date updateTime;

        public AddressInfoItem(Long id){
            this.id = id;
        }

    }
}
package cn.firecode.explore.account.controller;

import cn.firecode.explore.account.service.IUserAddressService;
import cn.firecode.explore.sdk.account.AddressInfo;
import io.swagger.annotations.Api;
import io.swagger.annotations.ApiOperation;
import lombok.extern.slf4j.Slf4j;
import org.springframework.web.bind.annotation.*;

import javax.annotation.Resource;

/**
 * <h1>用户地址api接口</h1>
 * @Project spring-cloud-explore
 * @Author flynn
 * @Date 2022/1/5
 */
@Api(tags = "用户地址服务")
@Slf4j
@RestController
@RequestMapping("/address")
public class AddressController {

    @Resource
    private IUserAddressService userAddressService;

    @ApiOperation(value = "当前用户", notes = "获取当前登录用户地址信息", httpMethod = "GET")
    @GetMapping("/current-list")
    public AddressInfo getCurrentAddressInfo(){
        return userAddressService.getCurrentAddressInfo();
    }

    @ApiOperation(value = "获取地址信息", notes = "根据地址ID获取地址信息", httpMethod = "GET")
    @GetMapping("/info/{id}")
    public AddressInfo getAddressInfoById(@PathVariable Long id){
        return userAddressService.getAddressInfoById(id);
    }

    @ApiOperation(value = "创建用户地址", notes = "创建用户地址接口", httpMethod = "POST")
    @PostMapping("/create")
    public AddressInfo createAddress(@RequestBody AddressInfo info){
        return userAddressService.createAddress(info);
    }


}
直接在类和字段上使用swagger的注解之后,swagger就会根据注解信息生成api文档,启动springboot 项目。
访问: hppt://ip:port/doc.html就可以查看文档。

3. Swagger 注解说明
| 作用范围 | API | API常用参数 | 作用位置 |
|---|---|---|---|
| 协议集描述 | @Api | @Api(tags = {"tag1","tag2","..."}) | controller类 |
| 协议描述 | @ApiOperation | @ApiOperation(value = "功能描述",notes = "备注") | controller类的方法 |
| 描述返回对象的意义 | @ApiModel | @ApiModel(value="类名",description="类描述") | 返回对象类 |
| 对象属性 | @ApiModelProperty | @ApiModelProperty(value = "类属性描述",required = true,example = "属性举例",notes = "备注") | 出入参数对象的字段 |
| 非对象参数集 | @ApiImplicitParams | @ApiImplicitParams({@ApiImplicitParam(),@ApiImplicitParam(),...}) | controller的方法 |
| 非对象参数描述 | @ApiImplicitParam | @ApiImplicitParam(name = "参数名",value = "参数描述",required = true,paramType = "接口传参类型",dataType = "参数数据类型") | @ApiImplicitParams的方法里用 |
| Response集 | @ApiResponses | @ApiResponses({ @ApiResponse(),@ApiResponse(),..}) | controller的方法 |
| Response | @ApiResponse | @ApiResponse(code = 10001, message = "返回信息") | @ApiResponses里用 |
| 忽略注解 | @ApiIgnore | @ApiIgnore | 类,方法,方法参数 |
4. Swagger整合SpringSecurity
在整合Swagger2和SpringSecurity的时候一直出现 org.springframework.security.access.AccessDeniedException: Access is denied 错误。 一看就是security配置错误,需要放行swagger的url,但是swagger的版本不同的情况下,url也不同,在尝试了百度的几个方案后发现都没有用。最终在stackOverflow上找到了解决方法: https://stackoverflow.com/questions/37671125/how-to-configure-spring-security-to-allow-swagger-url-to-be-accessed-without-aut
4.1 Swagger配置信息:
package com.keyinchina.plm.gateway.config;

import io.swagger.annotations.ApiOperation;
import org.springframework.context.annotation.Bean;
import org.springframework.context.annotation.Configuration;

import springfox.documentation.builders.ApiInfoBuilder;
import springfox.documentation.builders.PathSelectors;
import springfox.documentation.builders.RequestHandlerSelectors;
import springfox.documentation.service.ApiInfo;
import springfox.documentation.service.ApiKey;
import springfox.documentation.service.AuthorizationScope;
import springfox.documentation.service.SecurityReference;
import springfox.documentation.spi.DocumentationType;
import springfox.documentation.spi.service.contexts.SecurityContext;
import springfox.documentation.spring.web.plugins.ApiSelectorBuilder;
import springfox.documentation.spring.web.plugins.Docket;
import springfox.documentation.swagger2.annotations.EnableSwagger2;

import java.util.ArrayList;
import java.util.List;

/**
 * @author Flynn
 * @date 2021/5/8
 */
@Configuration
@EnableSwagger2
public class SwaggerConfig {

    @Bean
    public Docket createRestApi(){
        Docket docket = new Docket(DocumentationType.SWAGGER_2);
        // ApiInfoBuilder 用于在Swagger界面上添加各种信息
        ApiInfoBuilder builder = new ApiInfoBuilder();
        builder.title("XXXXXX系统");
        ApiInfo apiInfo = builder.build();
        docket.apiInfo(apiInfo);
		// ApiSelectorBuilder 用来设置哪些类中的方法会生成到REST API中
        ApiSelectorBuilder selectorBuilder = docket.select();
        selectorBuilder.paths(PathSelectors.any());
        //使用@ApiOperation的方法会被提取到REST API中
        selectorBuilder.apis(RequestHandlerSelectors.withMethodAnnotation(ApiOperation.class));
        docket = selectorBuilder.build();

        /*
		 * 下面的语句是开启对JWT的支持,当用户用Swagger调用受JWT认证保护的方法,
		 * 必须要先提交参数(例如令牌)
		*/
		//存储用户必须提交的参数
        List<ApiKey> apiKey = new ArrayList<>();
        //规定用户需要输入什么参数
        apiKey.add(new ApiKey("token", "token", "header"));
        docket.securitySchemes(apiKey);

        //如果用户JWT认证通过,则在Swagger中全局有效
        AuthorizationScope scope = new AuthorizationScope("global", "accessEverything");
        AuthorizationScope[] scopeArray = {scope};

        //存储令牌和作用域
        SecurityReference reference = new SecurityReference("token", scopeArray);
        List refList = new ArrayList();
        refList.add(reference);
        SecurityContext context = SecurityContext.builder().securityReferences(refList).build();
        List cxtList = new ArrayList();
        cxtList.add(context);
        docket.securityContexts(cxtList);
        return docket;

    }
}
4.2 SpringSecurity的配置信息:
@Configuration
public class WebSecurityConfiguration extends WebSecurityConfigurerAdapter {

	@Override
	public void configure(WebSecurity web) throws Exception {
    	web.ignoring().antMatchers("/v2/api-docs", "/configuration/ui",
            	"/swagger-resources/**", "/configuration/**", "/swagger-ui.html"
            	, "/webjars/**", "/csrf", "/");
	}
}


评论区